
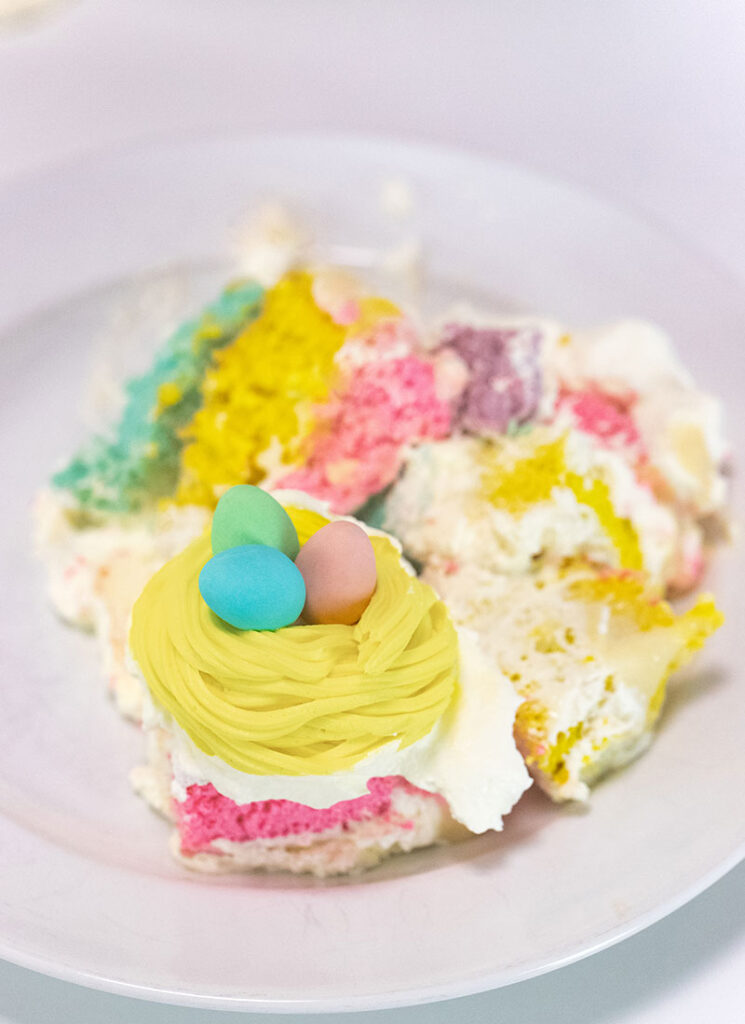
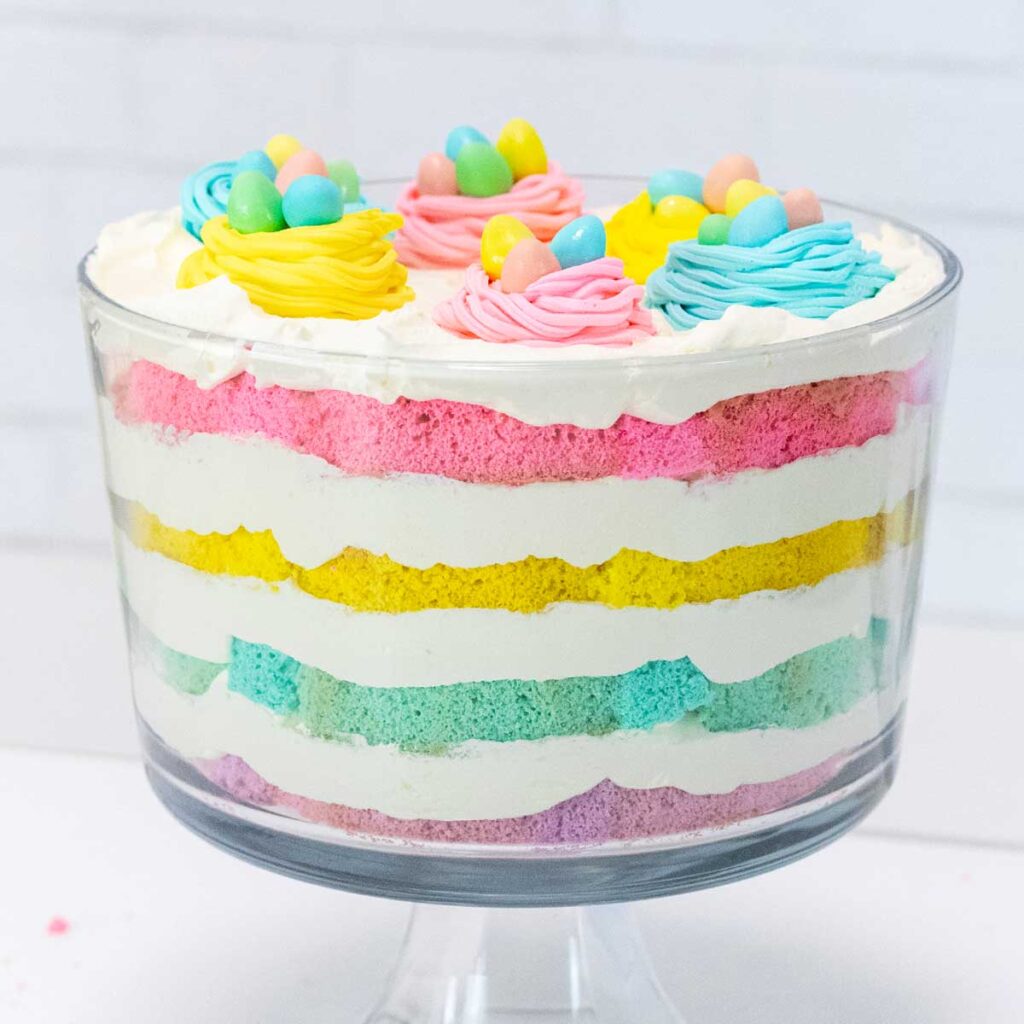
This stunningly colorful Easter trifle is adorned with equally eye-catching buttercream nests of mini eggs. Made with my no-fail vanilla cake and a perfectly sweetened homemade pudding, this layered dessert will put a smile on everyone’s faces while being the showstopper on your dessert table.

What is an Easter Trifle?
Easter trifle is a layered dessert typically served in a tall trifle dish. This layered dessert is perfect for Easter because of its bright spring colors, but the recipe can be adapted for all kinds of celebrations. Soft layers of vanilla cake are layered between sweet Cool Whip and thick, creamy, and colorful pudding, making this recipe fun to put together, and one the kids will be happy to help with! Bonus: it’s also easy to make!
Hosting an Easter brunch? This cinnamon bun cake is a lovely centerpiece on your holiday table. These Easter scrambled eggs with little colored quail eggs will make everyone smile! And you can easily whip up these Easter pancakes for the kids!
Why You’ll Love This Easter Trifle
- It’s a beautiful display: This Easter trifle looks so festive and pretty on your holiday table. The layers make everything think it’s fancy, and the bright colors and buttercream nests definitely turn heads!
- Tastes great: This recipe isn’t just pretty, it’s actually so delicious! My vanilla cake recipe is so sweet and moist, and my homemade pudding recipe is thick and rich.
- Easier than it looks: This recipe looks like the work of an advanced baker, but even a novice chef can make it. And, if you’re a bit short on time, you can use a few shortcuts (see below) to help make this even faster to put together.
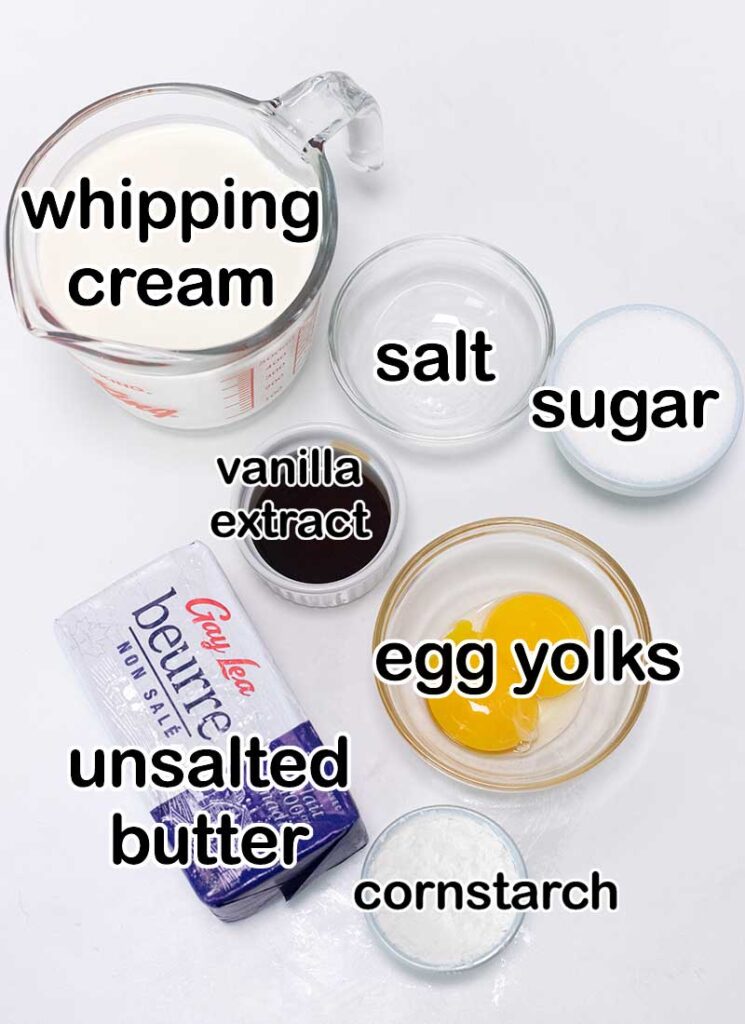
Ingredients for Easter Trifle
This trifle has 3 distinct layers: pudding & whipped cream, cake, and buttercream nests. Here’s what you’ll need for each layer.

For the Cake Layer:
- 1 batch of my Perfect Vanilla Cake batter (make the batter, but bake as directed below)
For the Vanilla Pudding and Cool Whip Layer:
- Granulated sugar
- Cornstarch
- Salt
- Whipping cream
- Egg yolks
- Vanilla extract
- Unsalted butter
- 1 Container of Cool Whip
For the Buttercream Nests:
- Unsalted butter
- Vanilla extract
- Powdered sugar
- Pink, yellow, purple, and blue food coloring
- Mini eggs
See below for a complete list of ingredients and amounts.
Ingredient Substitutions
- For the cake layer, you can substitute a cake mix if you need to save time, but a homemade vanilla cake will make this dessert extra special.
- For the pudding layer, you can use pudding mix if you don’t have time to cook your own. I’d recommend using cooked pudding, not instant.
- For the Cool Whip layer, homemade whipped cream will also work well, but you’ll want to assemble the trifle just a few hours before serving and keep it in the fridge so the whipped cream doesn’t collapse.
- For the food colors, the beautiful colors are what make this recipe look so festive, but you can exclude them if you want. You can also use different colors than I did.
How to Make an Easter Trifle
This recipe is made in a series of steps since all the individual elements are made from scratch. Here’s how you do it.

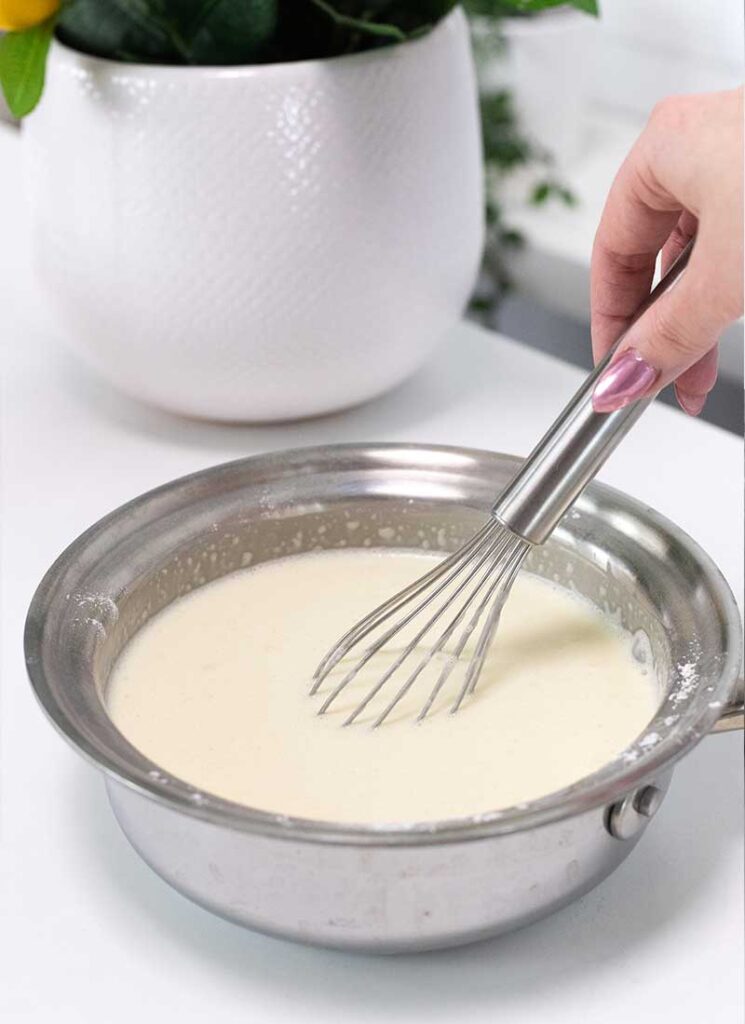

Step 1. Make the pudding.
Pour the sugar, cornstarch, and salt into a medium stock pot. Whisk to combine, then add the egg yolks and heavy cream and whisk again. Set the pot over medium-high heat and whisk constantly for 5-10 minutes until it’s gotten thick and the mixture is bubbling.
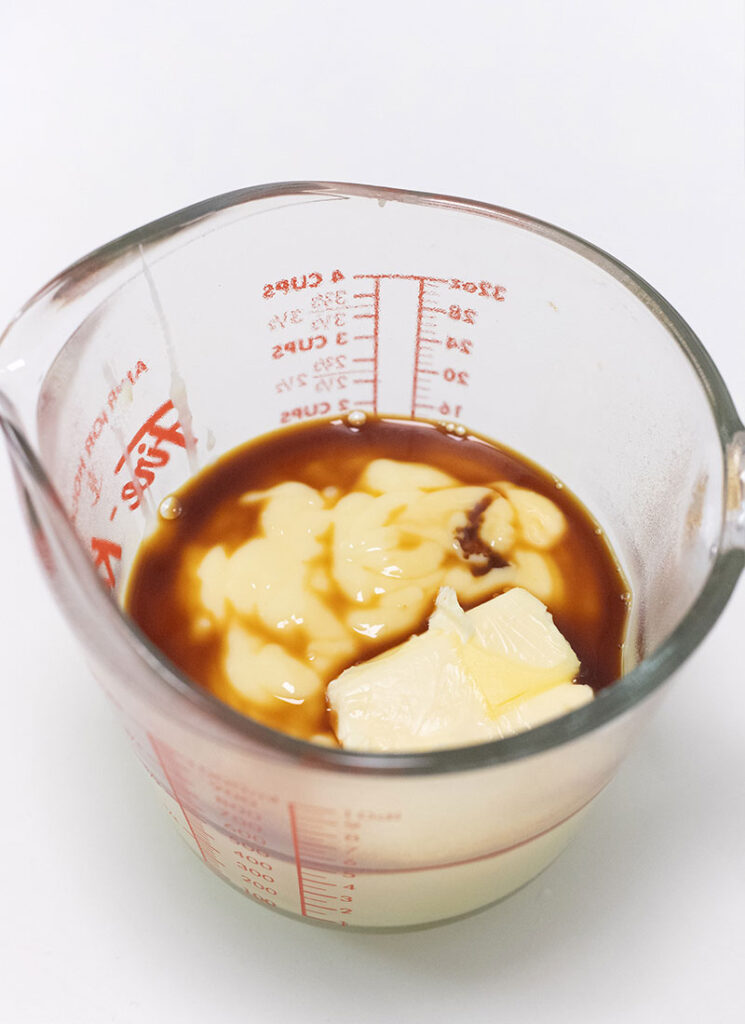
Pour the mixture through a sieve into a mixing bowl. Add in the vanilla extract and butter, then whisk until the mixture is fully combined.


Press a sheet of plastic wrap onto the surface of the pudding (so it doesn’t develop a pudding ‘skin’) and set the bowl into the fridge until chilled. This will take about 3 hours, but you can also make this the day before and leave it in the fridge overnight.
Step 2. Make the cake.
Make the cake batter as directed in my Perfect Vanilla Cake recipe (it’s the lightest, most delicious vanilla cake ever!). While you’re making the batter, preheat the oven to 350°F.

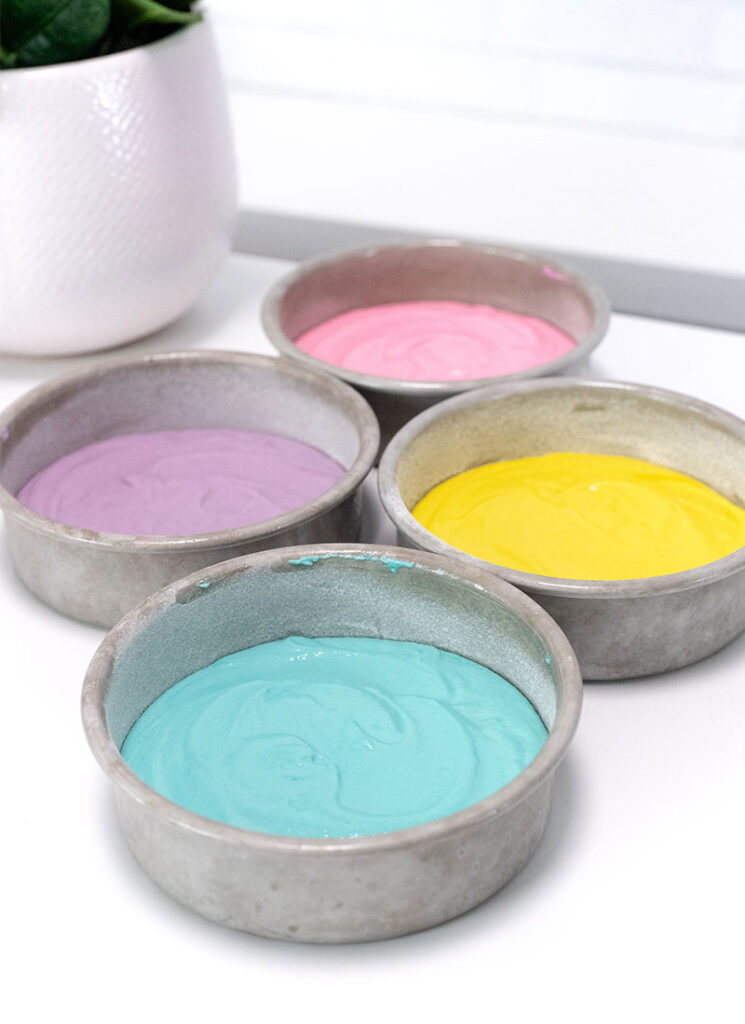
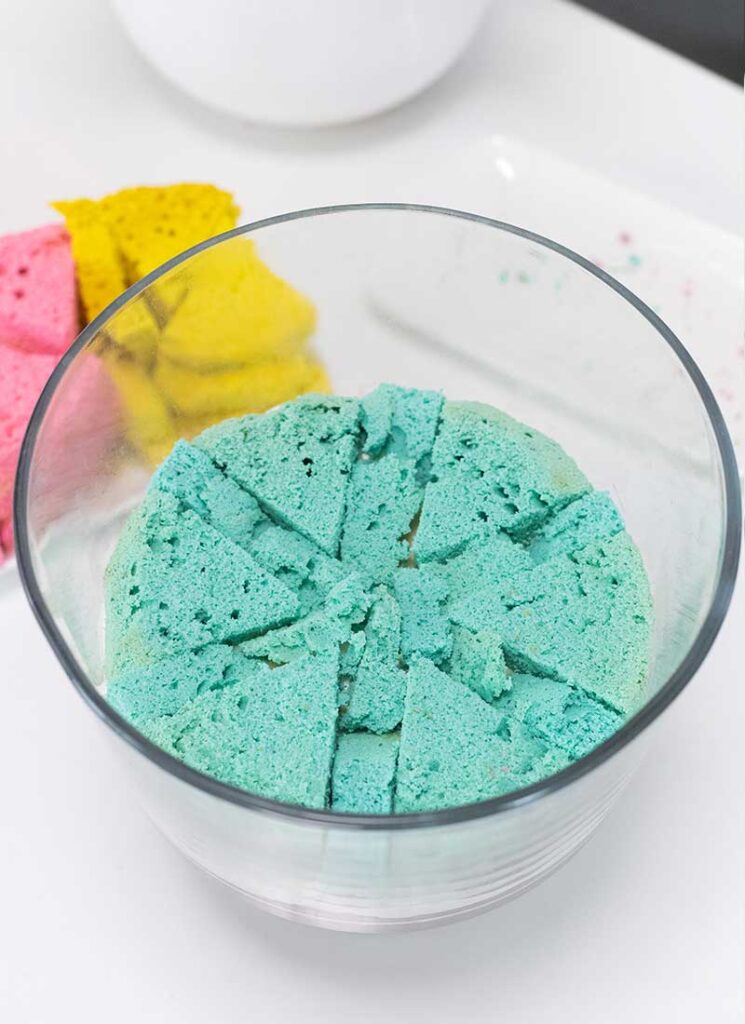
Divide the batter into 4 bowls. Dye each bowl a different color (I used pink, yellow, light blue, and light purple). Spoon each bowl of batter into a greased and floured 6-inch round cake pan. Bake for 25-30 minutes, until a toothpick inserted into the center of each cake comes out clean. Let the cakes cool completely.
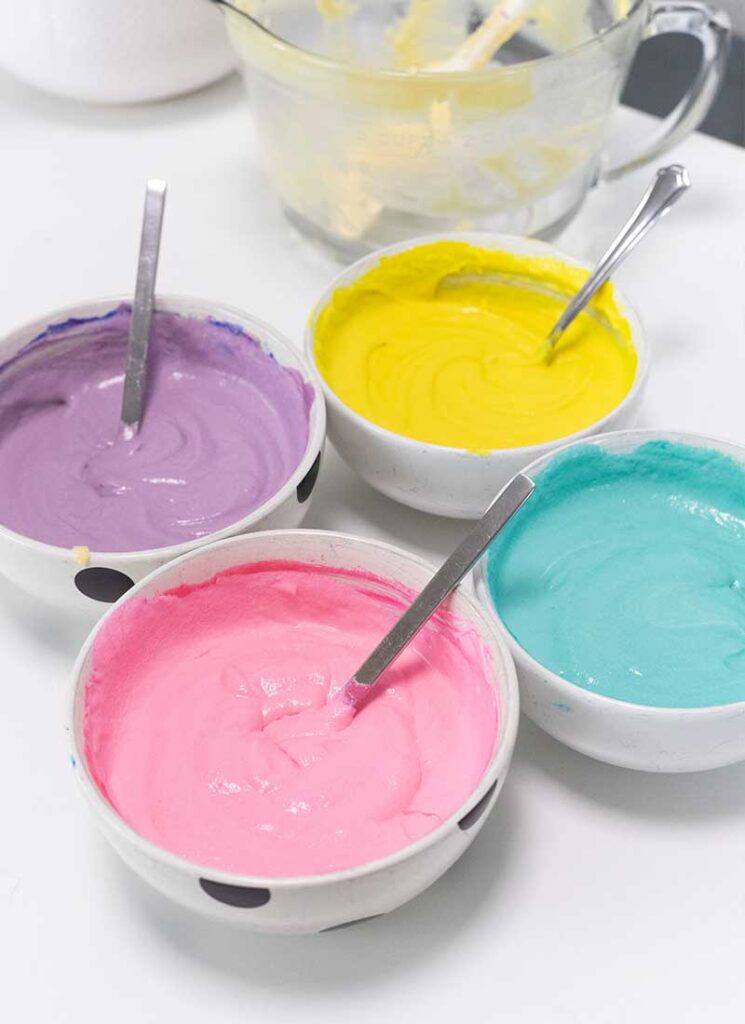
Step 3. Make the buttercream for the nests.
Make sure the butter is softened, then beat it with an electric mixer until it’s light and fluffy, about 2-3 minutes. Add in the vanilla extract and mix again until combined.


Add in the powdered sugar slowly, about 1 cup at a time, and mix well with each addition. After you add the last of the powdered sugar, mix for 2-3 minutes until the buttercream is light and fluffy.
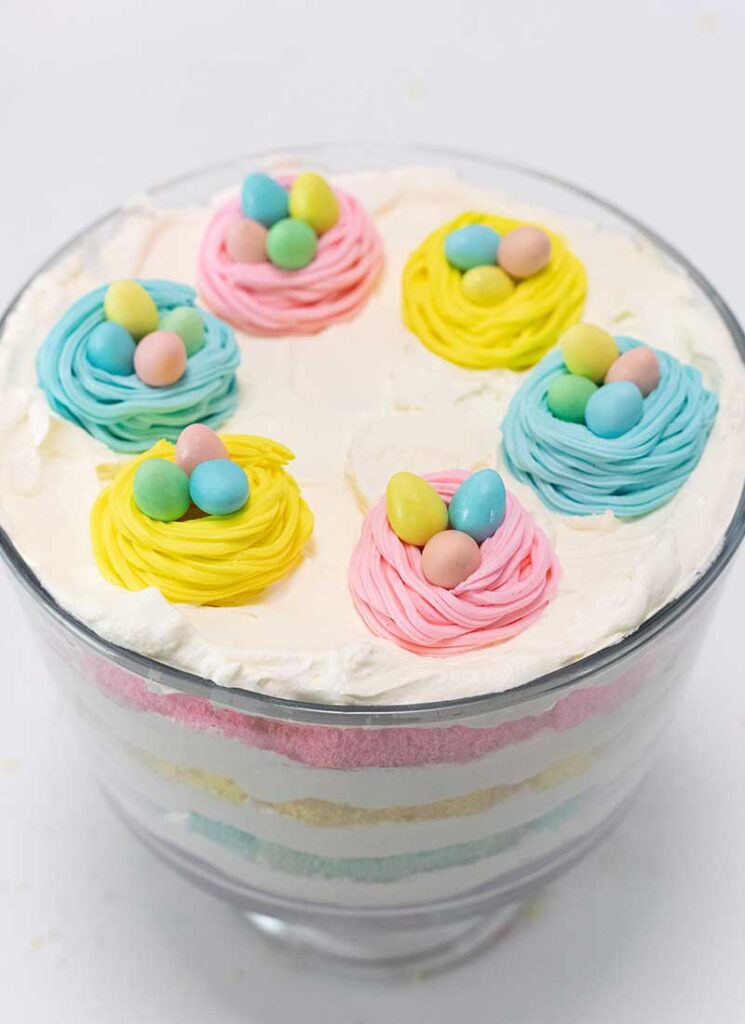
Divide the buttercream into 3 bowls. Dye each of the bowl a different color. I like to make pale pink, pale yellow, and pale blue. Scoop the buttercream into individual piping bags fitted with large, grass piping tips (they are #234 piping tips!).

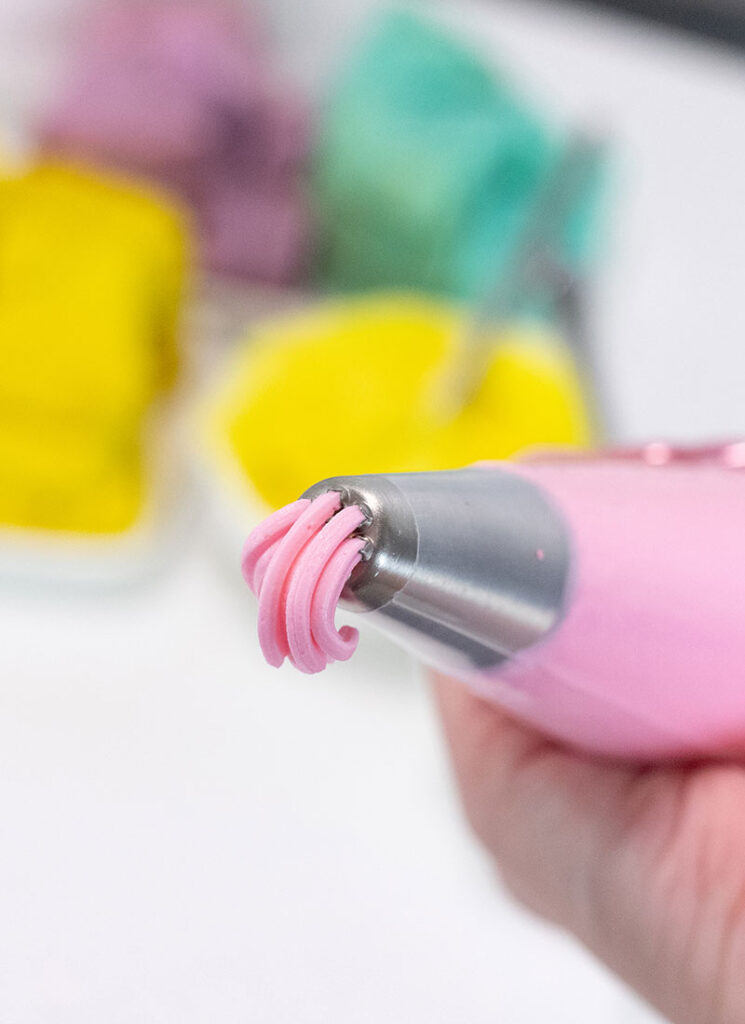
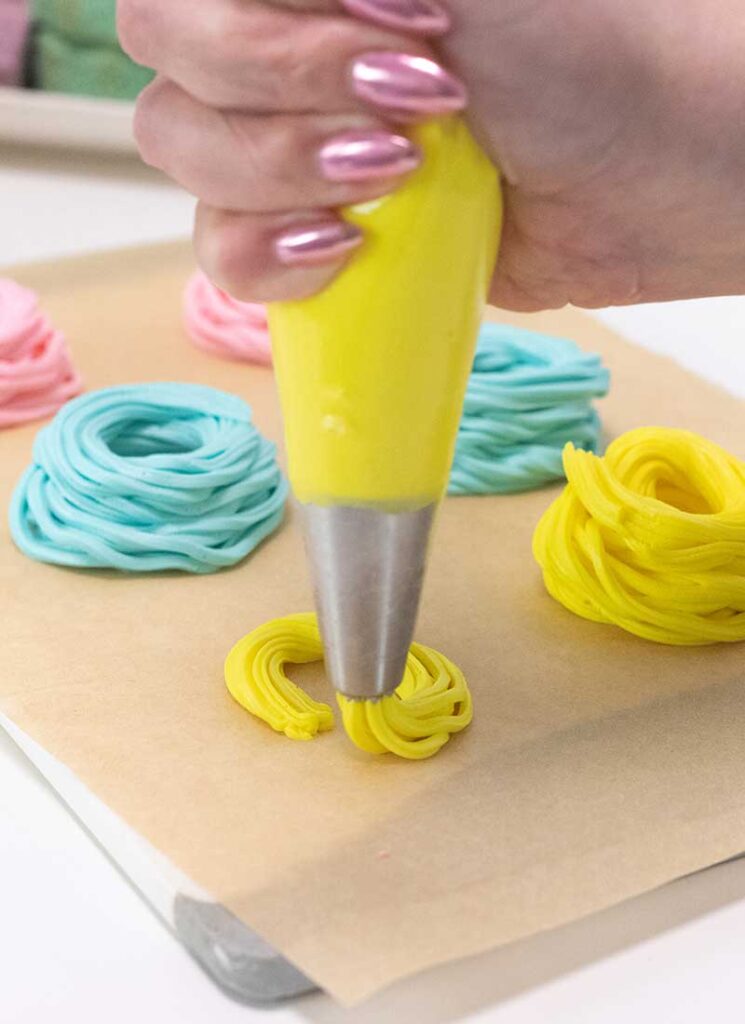
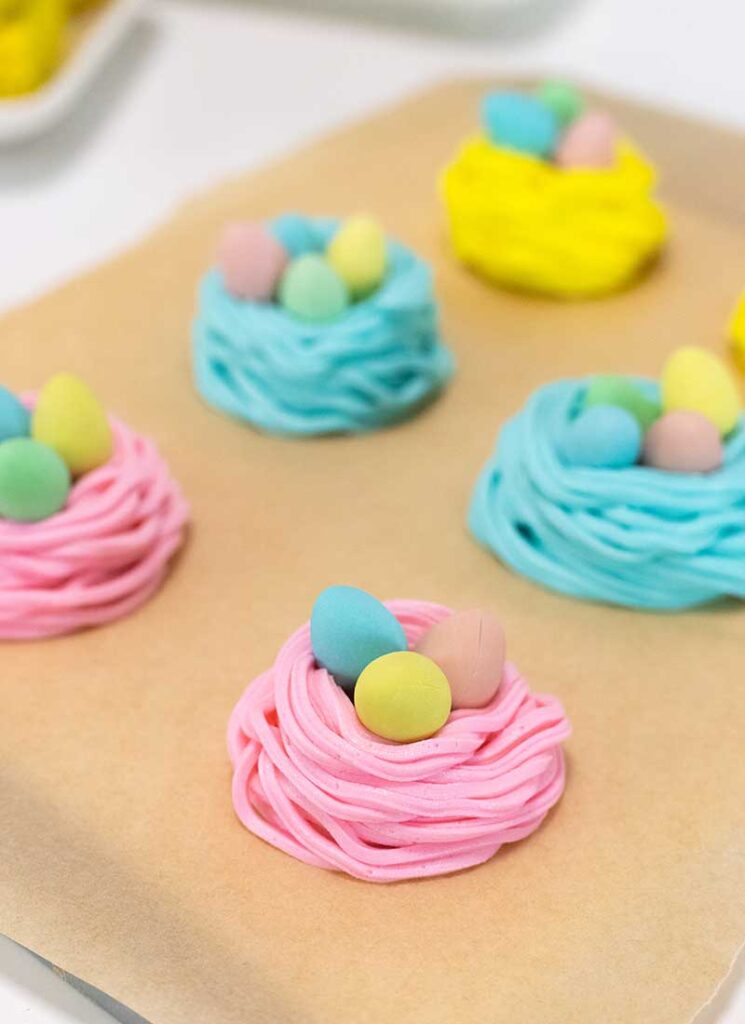
Create nests by piping rings of the pink, yellow, and blue buttercream onto a tray lined with parchment paper. Create 2 nests per color. Fill the nests with mini eggs. Place the entire tray into the freezer for the nests to harden to the touch. This will make it easier to transfer them to the trifle!

Step 4. Assemble your Easter trifle.
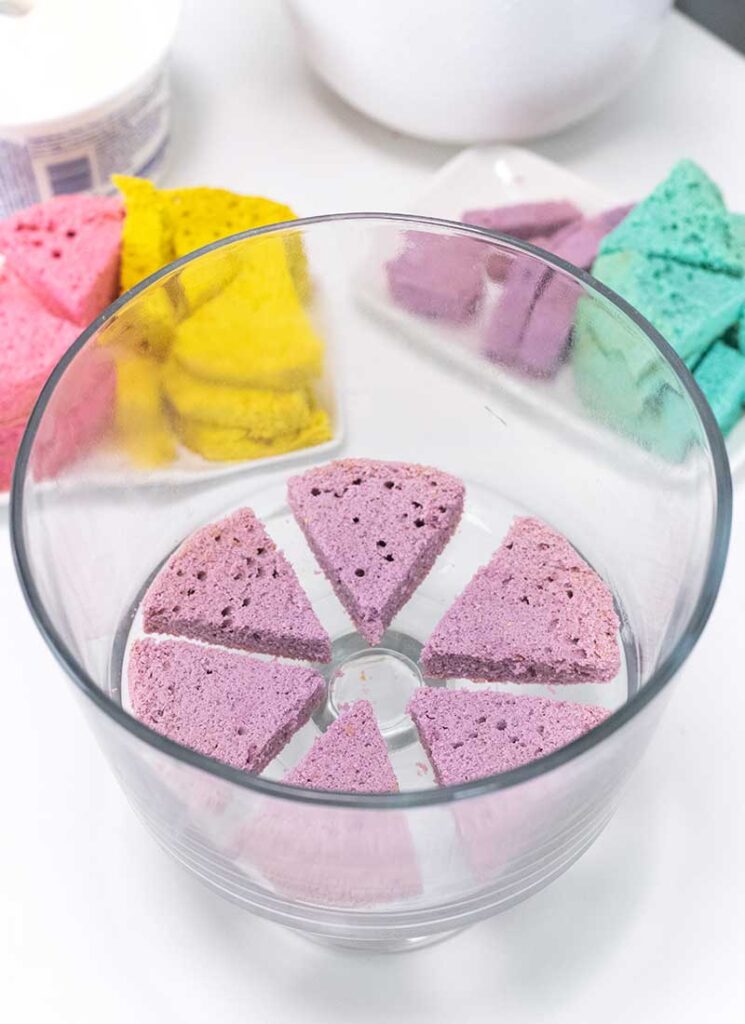
With a serrated knife, trim all the browned edges, tops, and bottoms off of the cakes. You can reserve these for cake pops, but we don’t want to use them in this recipe because we want the cake to look as bright and colorful as possible.


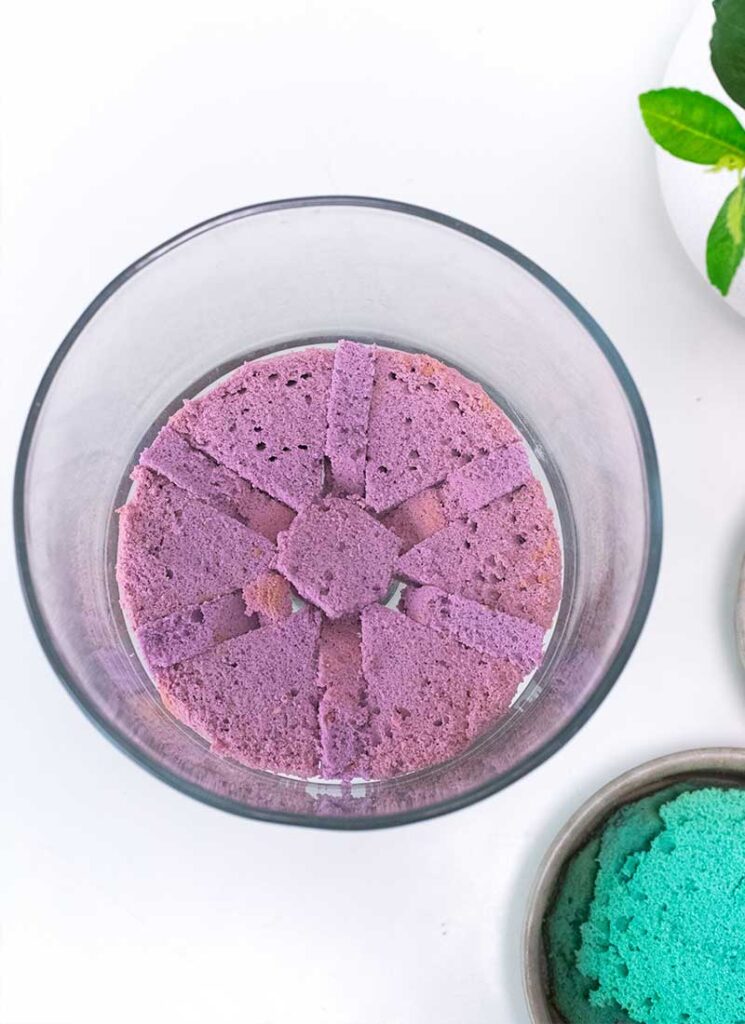
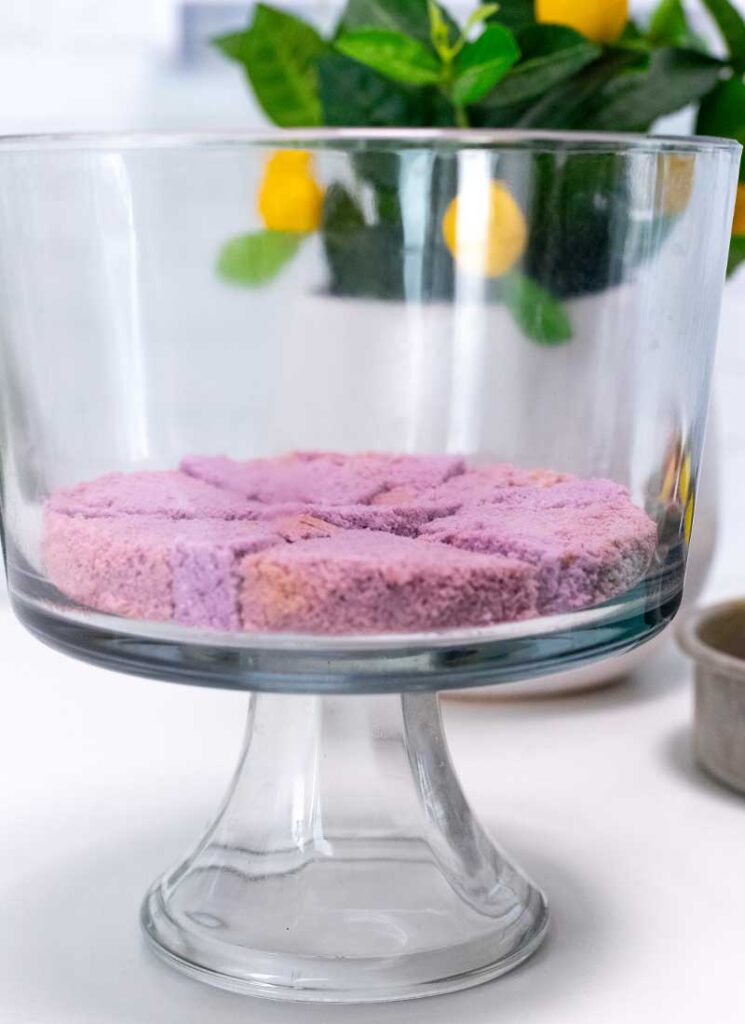
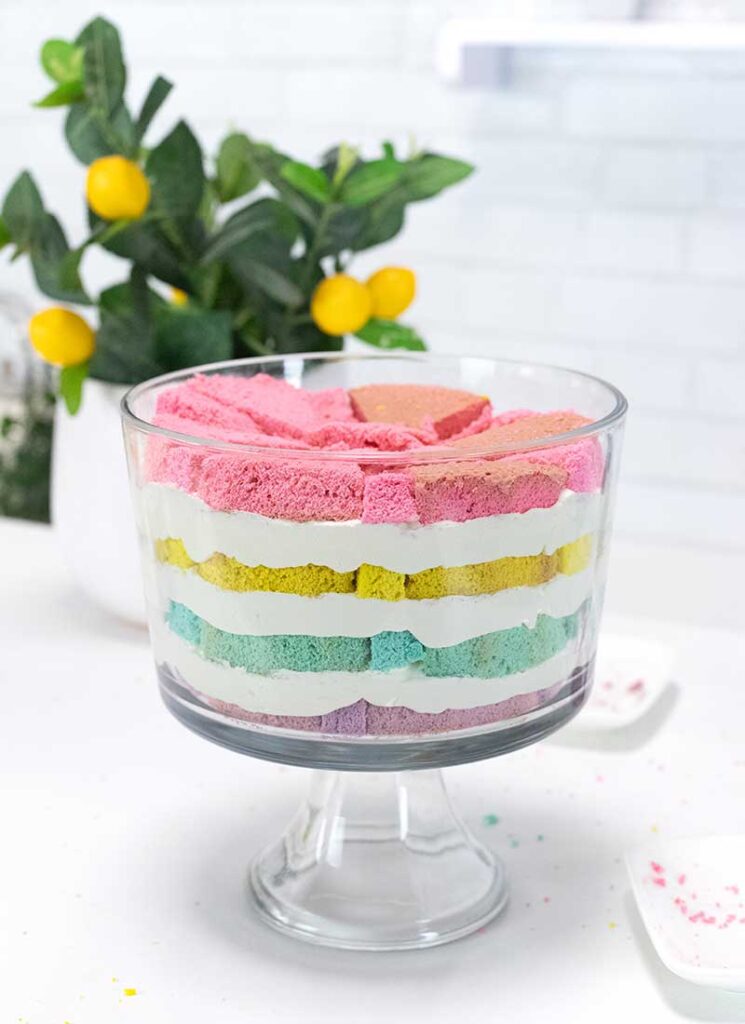
Cut the purple cake into small-medium pieces and place them into the base of your trifle dish. Check the sides of the dish to be sure the cake pieces look even on all sides.

Place the Cool Whip into a piping bag fitted with a large round piping tip. Pipe a ring of Cool Whip around the edge of the dish and a large dollop in the middle of the dish. Spoon the vanilla pudding into the empty ring in the center.

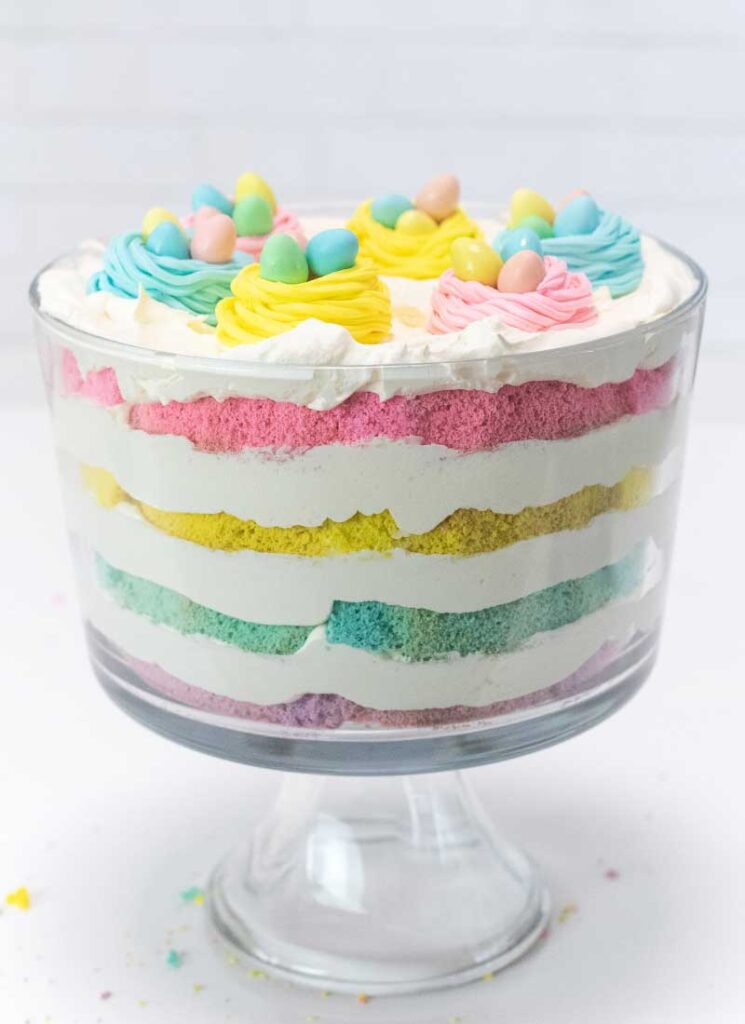
Repeat the entire process using the blue cake, add top with more Cool Whip and pudding. Then repeat with the yellow cake, then finally, the pink cake. Spread all the remaining Cool Whip over the top of the trifle.

Place the frozen nests in a circle on top of the trifle. Refrigerate the trifle for at least 4 hours for best results, or serve immediately! Enjoy!

Helpful Tools
Recipe Variations
This trifle is simple to change up for various holidays and celebrations. It’s really as simple as changing up the flavors or colors of the pudding and cake. Here are some ideas:
- Make a chocolate explosion trifle by using a rich chocolate cake, chocolate pudding, and Cool Whip. Decorate the top with chocolate curls and your favorite crushed-up candy bars.
- For a birthday celebration, use FunFetti cake mix, vanilla pudding, and Cool Whip. Top with birthday sprinkles and candles.
- Make a Christmas trifle by dyeing your vanilla cake red and green, and leaving the vanilla pudding it’s natural pale yellow color. Sprinkle the top with swirls of Cool Whip and your favorite holiday candies, such as red and green M&Ms or Hershey Kisses.
- Turn this into a dreamy Valentine’s treat by making light pink cake and layering in sliced strawberries. Decorate the top with additional Cool Whip swirls, more strawberries, and chocolate drizzle.

Tips for Making Perfect Easter Trifle
- You can change up the recipe by including fruit, your favorite candies, or other flavors of cake, such as lemon.
- Make sure you use fresh ingredients. You need your cold ingredients to be at room temperature, so remove them from the fridge about 30 minutes before you start baking.
- Don’t overmix your batters, especially for the vanilla cakes. This will help them bake up light and fluffy.
- This recipe is best after it’s been in the fridge for a few hours. Try to make it at least 4 hours before serving so it has time to set, but no more than 24 hours before, as the cake will start to get soggy if it sits too long.
Storage Directions
At room temperature – Because this cake includes Cool Whip and pudding, it’s best to store it in the fridge. After you’ve finished serving, return this trifle to the fridge for longer storage.
In the refrigerator – Easter trifle will be good for up to 3 days if covered in the refrigerator. You may find your cake starts to get a touch soggy, but it will still taste delicious.
In the freezer – You an also freeze trifle for up to 2 weeks. It’s best to move the trifle into a plastic or glass airtight container. When you’re ready to enjoy it again, thaw it overnight in the refrigerator. Just keep in mind that the whipped cream (and fruit if you added any) might end up losing its structure when it thaws, so if you’re serving this to guests, it’s best to make it fresh.
FAQ
What kind of cake should I use in a trifle?
The kind of cake you use for your trifle really depends on the theme and flavor you want your final trifle to have. For Easter trifle, I like using a vanilla cake, but you can use any flavor of cake you’d like.
Do I use custard or pudding in a trifle?
Traditional English trifles often use custard, while American versions tend to use pudding. Both custard and pudding can work well in a trifle, and both provide a creamy and flavorful layer between the cake. Some people even use both custard and pudding layers! Ultimately, the choice between custard or pudding comes down to what you prefer in terms of taste and texture.
How many layers should a trifle dessert have?
Most of the time, trifles include at least 3 layers, but you can make as many as you’d like, or as many as your trifle dish will hold. There’s no set rule about how many layers it needs to have, so follow your heart and your belly!
Other Amazing Easter Recipes to Try

A creamy vanilla cheesecake parfait with a delicious Nilla wafer base.
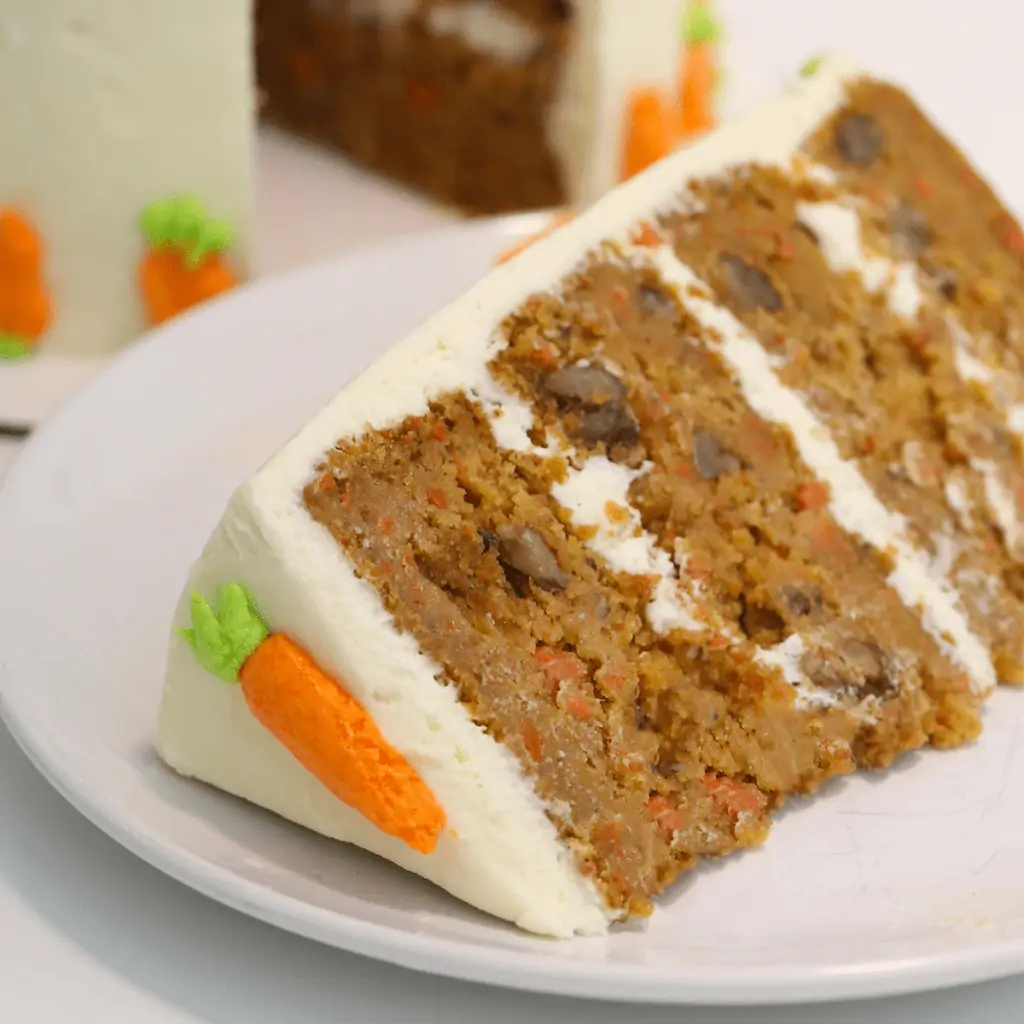
Moist Carrot Cake with Cream Cheese Frosting
Homemade carrot cake with fresh carrots and walnuts layered between rich cream cheese frosting.
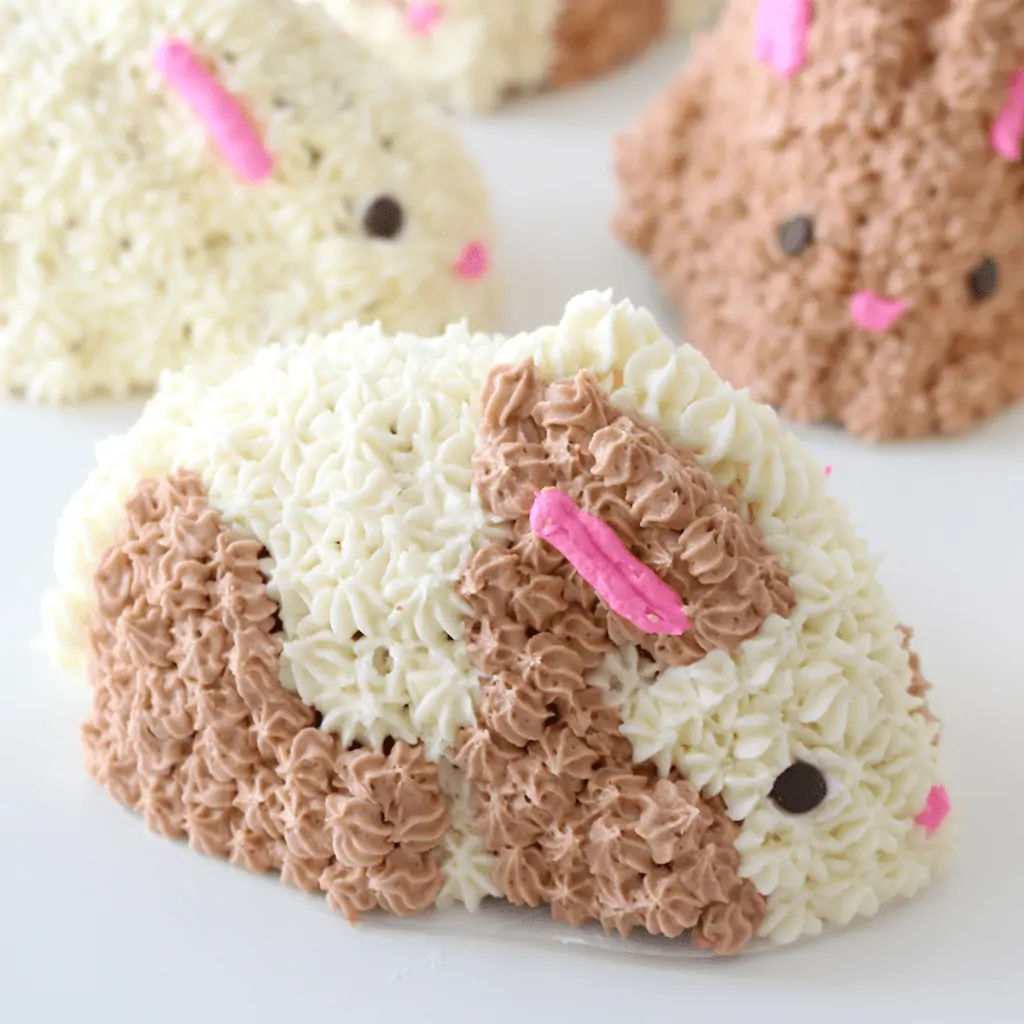
Individual cakes shaped like adorable bunnies! Top them with creamy buttercream and serve alongside fresh fruit for a spring-y treat.

These baked doughnuts are packed with mini eggs, both on top like a nest and INSIDE the doughnuts themselves!
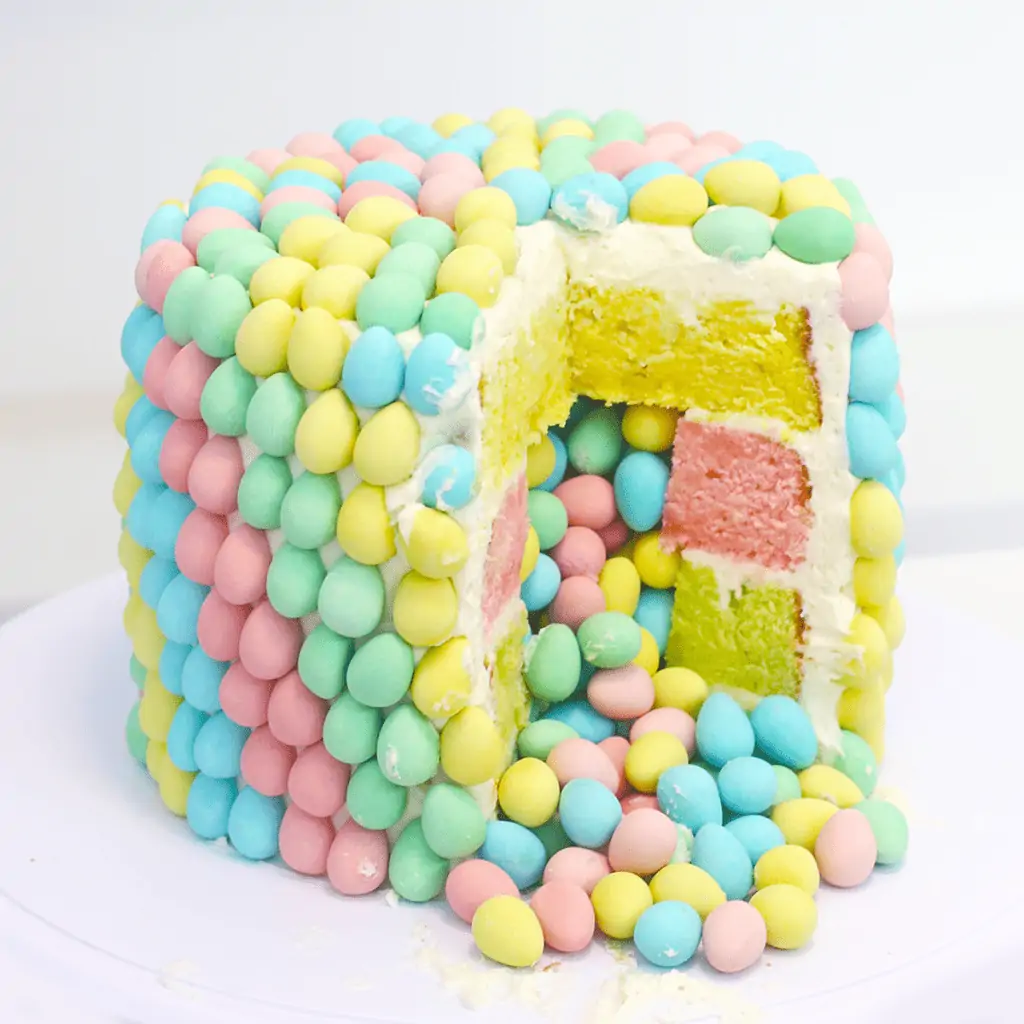
Slice into this cake to reveal MORE mini eggs that come pouring out the center!
Easter Trifle
This stunningly colorful Easter trifle is adorned with equally eye-catching buttercream nests of mini eggs.
Equipment
- three #234 grass piping tip
Ingredients
- 1 batch of my Perfect Vanilla Cake batter
- food coloring pink, yellow, blue and purple
Vanilla pudding:
- ½ cup granulated sugar
- 3 tbsp cornstarch
- pinch salt
- 2 cups whipping cream
- 2 large egg yolks
- 1 tsp vanilla extract
- 2 tbsp unsalted butter
- 1 16 oz container Cool Whip thawed
Nests:
- 1 cup unsalted butter room temperature
- 1 tsp vanilla extract
- 2 ½ cups powdered sugar
- food coloring pink, yellow and blue
- ½ cup mini eggs
Instructions
Make the pudding:
- Pour the sugar, cornstarch and salt into a pot. Whisk to combine. Add the egg yolks and heavy cream and whisk until well combined. Set the pot to medium-high heat and whisk constantly for 5-10 minutes, until the mixture has thickened and is bubbling.
- Pour the pudding through a sieve, then add the vanilla extract and butter, whisking until well combined.
- Press a sheet of plastic wrap onto the surface of the pudding and place in the fridge until chilled, about 3 hours. You can also make this in advance and chill it in the fridge overnight.
Bake the cake:
- Preheat the oven to 350F.
- Divide the batter into 4 bowls. Dye it pink, yellow, blue and purple. Spoon each bowl of batter into a greased and floured 6-inch round cake pan.
- Bake for 25-30 minutes, until a skewer inserted into each cake comes out clean. Cool completely.
Make the nests:
- Beat the butter with an electric mixer until light and fluffy. Add the vanilla extract and mix until combined.
- Add the powdered sugar one cup at a time, beating with each addition. Then mix for 2-3 minutes, until the buttercream is light and fluffy.
- Divide the buttercream into 3 bowls. Dye it pale pink, pale yellow and pale blue. Place it into piping bags fitted with large, grass piping tips (I used #234 piping tips).
- Line a tray with parchment paper. This tray should be able to fit in your freezer.
- Create the nests by piping rings of the pink, yellow and blue buttercream onto the tray. Create 2 nests per color. Fill the nests with mini eggs and place the tray into the freezer while you assemble the trifle.
Assembly:
- Use a serrated knife to trim off the browned tops, bottoms and edges of the cake. You can reserve these for cake pops, but we don’t want to use them in this recipe because we want the cake to look as bright and colorful as possible through the sides of the glass. Then slice each cake into 2 layers. The base layer will be flat and the top layer will be slightly risen.
- Cut the flat purple cake into six wedges and the rounded layer into strips. Place them into the base of a 3.25 quart trifle dish, arranging the strips between the wedges. Check the sides of the dish to ensure that the cake looks even on all sides. Stick any remaining pieces of cake into empty areas.
- Place the Cool Whip into a piping bag fitted with a large, round piping tip. Pipe a ring of cool whip around the edge of the dish and a large dollop in the middle of the dish. Spoon the vanilla pudding into the empty ring in the center.
- Repeat with another layer of cake – blue this time! Then follow with another ring and dollop of cool whip and then the pudding. Continue with the yellow cake, then the pink layer.
- Spread the remaining Cool Whip over the entire surface of the trifle.
- Peel the nests off the parchment paper and gently place them in a ring on top of the trifle. Serve and enjoy!
Notes
This trifle should serve about 15-20 people, as it is quite large. The nutritional facts are calculated based on the trifle serving 20 people, so about one generous spoonful as seen in a photo within this post.
Nutrition
Serving: 1large scoopCalories: 612kcalCarbohydrates: 57.3gProtein: 8.5gFat: 39.8gSaturated Fat: 27.9gCholesterol: 278mgSodium: 1444mgPotassium: 103mgFiber: 0.6gSugar: 31.3gCalcium: 52mgIron: 2mg
Tried this recipe?Let us know how it was!

Hi everyone! My name is Cayla Gallagher and I’m the creator of pankobunny!

I’m In The Mood For:
@pankobunny
This error message is only visible to WordPress admins
Error: Invalid Feed ID.