
No-Bake Rainbow Cheesecake Without Gelatin
Ingredients
Cheesecake base:
- 200 g animal crackers crumbled into very small pieces
- 65 g unsalted butter melted
Cheesecake filling:
- 400 g cream cheese room temperature
- 400 ml whipping cream
- 80 g sugar
- ¼ cup lemon juice
- ½ tsp vanilla extract
- pink, orange, yellow, green, blue and purple food colouring
Instructions
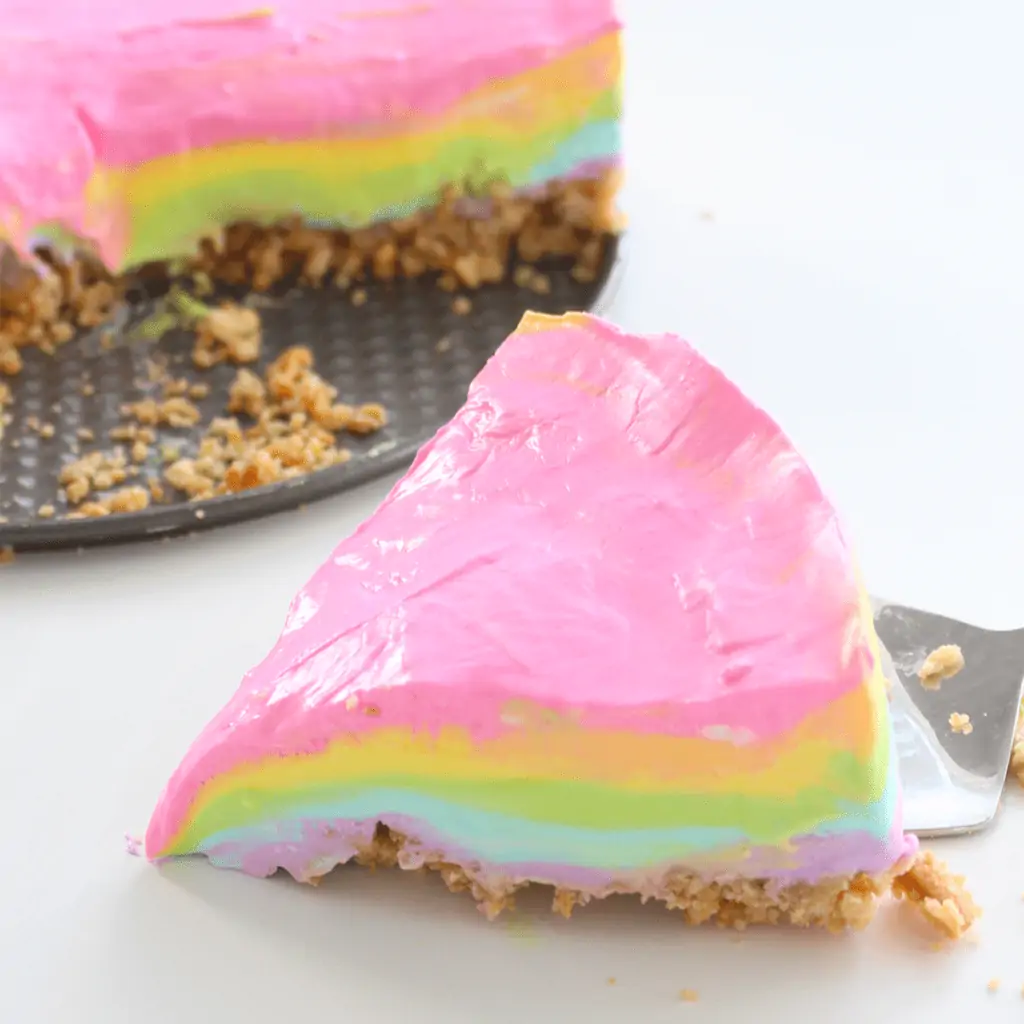
- First, make the base of the cheesecake. Mix together the melted butter and crumbled animal crackers, then press them into the bottom of an 8-inch spring form pan. Then place this in the fridge while you make the filling.
- To make the filling, place the cream cheese in a bowl and beat with an electric mixer until smooth. Add the sugar and combine. Then add the whipping cream, lemon juice and vanilla extract mix until smooth. Divide the mixture into 6 bowls and dye them the colours of the rainbow.
- Pour the filling into the cake pan one colour at a time, freezing for 10 minutes between each layer. This will prevent the layers from mixing together. Return the cheesecake to the freezer to set for 1-2 hours. You don’t want the cheesecake to freeze, just for it to stiffen. If you prefer soft cheesecake, only freeze it for 1 hour, as I did in the video. If you’d like it to be a little firmer, keep it in the freezer for 2 hours.
- Wet a dishcloth with hot water and run it around the sides of the pan to slightly warm the cake. Remove the sides of the pan, slice and enjoy!
Video
Notes
Want to see more video tutorials? Check out all of my recipes here!
http://www.youtube.com/pankobunny
Tried this recipe?Let us know how it was!

Hi everyone! My name is Cayla Gallagher and I’m the creator of pankobunny!

I’m In The Mood For:
@pankobunny
This error message is only visible to WordPress admins
Error: Invalid Feed ID.