
Matcha Lily Pad Shortbread
Ingredients
- 2 cups all-purpose flour
- 2 tbsp matcha green tea powder
- ½ tsp salt
- ½ pound unsalted butter room temperature (1 cup?)
- ½ cup sugar
- 230 g confectioner’s sugar switch to grams 115g
- 2 1/2 tbsp meringue powder
- 1/4 cup water
- pink and yellow food colouring
- matcha green tea powder
Instructions
- Beat the butter with an electric mixture until it is light and fluffy. Add the sugar and beat until it lightens in colour, about 2 minutes. Add the flour, matcha green tea powder and salt and mix on low until just combined.
- Dust a large sheet of parchment paper with flour and place the dough on top. Roll the dough out until it is 1/4-inch thick. Transfer the dough, with the parchment paper, to the fridge and chill until the dough stiffens, about 30 minutes.
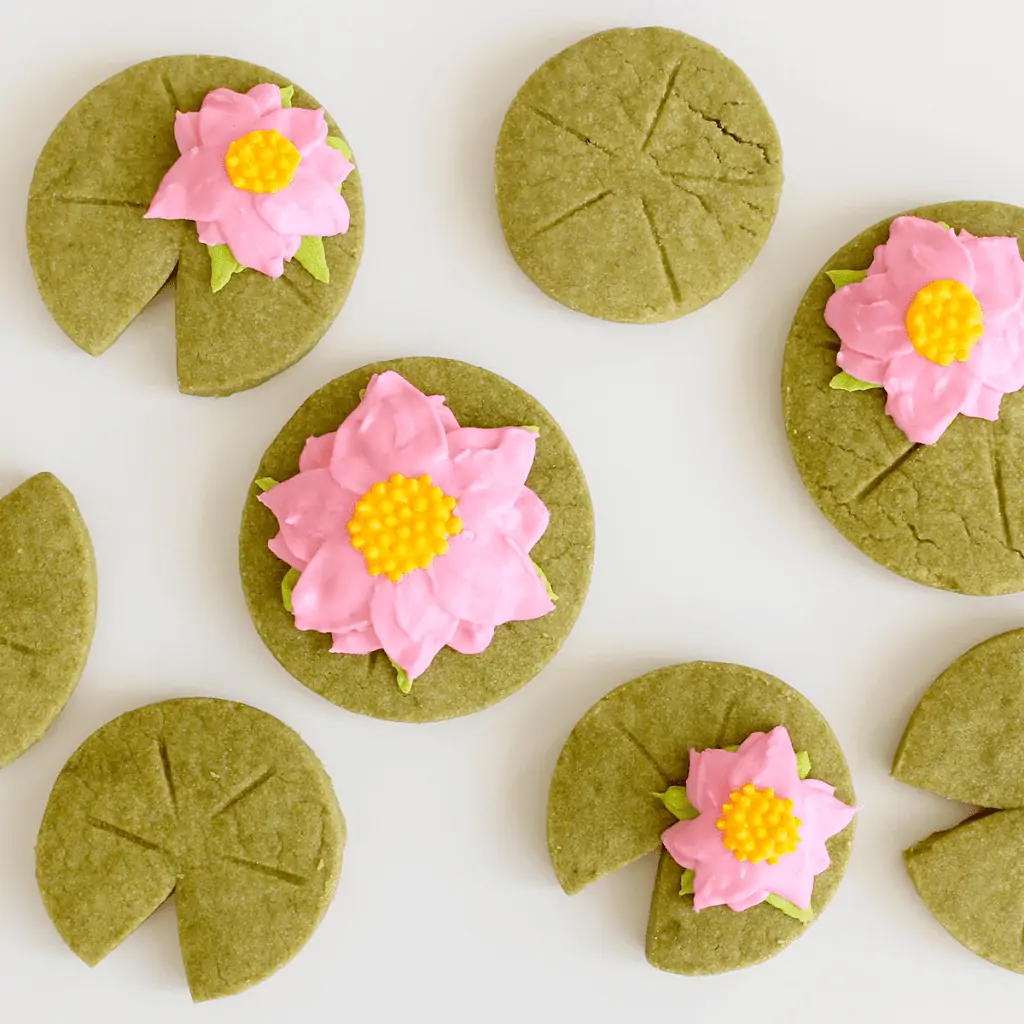
- Cut the dough into circles, then slice a triangle shape out of each circle and make indentations on the surface to look like the veins of the lily pads.
- Using a spatula, gently transfer these to baking sheets lined with parchment paper and return to the fridge until the dough is very firm. Bake at 325F for 15-20 min just until the edges show signs of colouring. Transfer to a wire rack and cool completely.
- To make the blossoms, place the confectioner’s sugar, meringue powder and water in a bowl and beat with an electric mixer for about 7 minutes. Divide into 3 bowls and dye the icing in one bowl pink, one bowl yellow and one bowl green with the matcha green tea powder. If adding the powder dries the icing out too much, add a few drops of water and mix well.
- Place the icing into piping bags. (Note: check the video to see which piping tips I used.) Then starting with the green icing, pipe the leaves of the blossom onto as many cookies as you like, and allow the icing to fully harden, about 10-15 minutes. Pipe on the petals using the pink icing, allowing the icing to fully set between each petal layer. Once all of the petals have fully dried, pipe a yellow circle into the center of each flower and fill in the circle to create a yellow disk. Allow this to fully set, then pipe on little yellow dots to look like the center of the flower. Allow these to fully set and enjoy!
Video
Notes
Want to see more video tutorials? Check out all of my recipes here!
http://www.youtube.com/pankobunny
Tried this recipe?Let us know how it was!

Hi everyone! My name is Cayla Gallagher and I’m the creator of pankobunny!
I’m In The Mood For:
@pankobunny
This error message is only visible to WordPress admins
Error: Invalid Feed ID.


