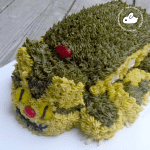
CatBus Cake from Totoro
A sour cream CatBus Cake from the popular Studio Ghibli movie, Totoro!
Ingredients
Sour Cream Pound Cake
- 3 cups flour
- ¼ tsp baking soda
- a pinch of salt
- 1 cup butter softened to room temperature
- 3 cups sugar
- 6 eggs separated
- 1 tsp vanilla extract
- 1 tsp lemon extract
- 1 cup sour cream
Buttercream
- 8 tbsp butter
- 3 cups icing sugar
- 6 tsp milk
- 8 donut holes timbits
- 2 red jelly beans
- slivered almonds
- brown yellow and black food colouring
Instructions
Sour Cream Pound Cake
- Sift the flour, salt and baking soda together.
- In a separate bowl, cream butter and sugar until white and fluffy.
- Add egg yolks one at a time, beat well after each addition. Stir in vanilla and lemon extract.
- Add flour mixture and sour cream alternatively, beating until well blended.
- Beat egg whites until still, and fold into batter.
- Pour into 2 greased and floured 9″ x 5″ loaf pans, and bake at 350F for 40 minutes.
- Cool in the pan for 10 minutes, then invert onto a wire rack and cool completely.
To Make the Buttercream
- Sift the icing sugar and mix together with the butter with a spoon.
- Add the milk a tablespoon at a time until the icing becomes thick, like a paste or the consistency of soft cream cheese.
To Assemble the CatBus
- Cut the ends off of one of the loaves. Cut about a 5-6 centimeter slice from one end, and a 1-2 centimeter slice from the other.
- Use the 5-6 centimeter thick slice as the cat’s head, and cut it into a circular shape. With the remaining scraps of cake, use two triangle-shaped pieces of cake as the ears, reshaping as necessary.
- With the second, unused loaf, cut it in half and use one half for the tail. Cut that half into a crescent shape, and continue shaping it until it fits nicely against the body of the catbus, which is the loaf used in step 1.
- Even the sides of the catbus’ body by cutting a thin slice (about 1 cm) of cake from each side of the loaf. Then cut the top edges of the body, giving the body a smoother-looking shape.
- Line up the donut holes (timbits) along the sides of the catbus, and secure these as well as the tail, head and ears to the body with toothpicks.
To Decorate the CatBus
- It’s very difficult to move to cake after icing and decorating it, so before you begin the icing process, it is recommended to move it onto the plate you will use for serving
- Divide the icing into two bowls, and then take a small amount of icing and divide that into a further three small bowls.
- With food colouring, colour the icing in the bigger bowls a brown and a light yellow colour. Colour the icing in the smaller bowls black and a bright yellow, and leave the third bowl of icing white.
- With a small, round tip piping tip, draw the eyes of the catbus onto the cat’s face, using the bright yellow icing. Using the same icing tip and the white icing in the smaller bowl, pipe the cat’s smile onto the cake. With the black icing, pipe the details of the smile and eyes.
- Next, using a star tip icing tip, pipe on the fur of the catbus using the brown and light yellow icing in the big bowls. It is helpful to look at a picture of the catbus while doing this, to achieve a similar fur pattern. Tip: This kind of icing dries quite quickly, so be sure to place the red jelly beans for the bus sign and nose right after you pipe the icing onto that area.
- For the toenails, stick three almond slivers into the base of each donut hole.
- Serve and enjoy!!
Video
Notes
- depending on the weather and humidity, the amount of milk that the icing sugar will absorb differs
-the icing dries quickly, so add any decorations as soon as you pipe the icing in that area
-be sure to put the cake onto the plate you plan to serve it on before you pipe the icing on
-the icing dries quickly, so add any decorations as soon as you pipe the icing in that area
-be sure to put the cake onto the plate you plan to serve it on before you pipe the icing on