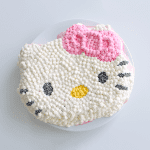
Hello Kitty Ice Cream Cake
Ingredients
- Hello Kitty Ice Cream room temperature (recipe here)
- any desired flavour of ice cream room temperature
- 3 cups whipping cream
- ½ cup confectioner’s sugar
- 1½ tsp vanilla extract
- pink yellow and black food colouring
Instructions
- Line a Hello Kitty-shaped cake tin with plastic wrap. Pour in the Hello Kitty ice cream and another flavour of ice cream and gently swirl them together. If you’d like two clean layers, pour in one flavour then place the cake tin in the freezer until fully set. Then pour in the second layer.
- Gently press a sheet of plastic wrap onto the surface of the softened ice cream, and transfer the cake tin to the freezer until the ice cream is completely set, about 6 hours to overnight.
- Whip the whipping cream in a large bowl until stiff peaks form. Mix in the confectioner’s sugar and vanilla extract.
- Place a small amount of whipped cream in 3 bowls, and dye them pink, yellow and black/grey. Place the white, pink, yellow and grey whipped cream into piping bags fitted with star-shaped piping tips.
- Remove the cake from the freezer and peel off the top layer of plastic wrap. Flip the cake onto a serving platter of your choice and gently lift the tin and peel the plastic wrap off of the cake.
- Begin piping Hello Kitty’s nose with the yellow whipped cream, eyes and whiskers with the black whipped cream and ribbon with the pink whipped cream. You can pipe on multiple layers of whipped cream to give the ribbon some dimension. Fill in the remaining spots with the white whipped cream. While piping, return the cake to the freezer every 5-10 minutes to prevent the cake from melting. Piping the sides of the cake can be tricky, so shallow cake tins will work best.
Video
Notes
Want to see more video tutorials? Check out all of my recipes here!
http://www.youtube.com/pankobunny
