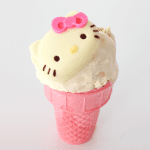
Hello Kitty Ice Cream
Ingredients
- ½ recipe of Homemade Vanilla Ice Cream softened (recipe here)
- 1/4 cup Homemade Strawberry Jam recipe here
- white chocolate melted
- dark chocolate melted
- pink and yellow oil-based food colouring
- condensed milk
Instructions
- Using a Hello Kitty silicone chocolate mold, draw on Hello Kitty’s eyes and whiskers with dark chocolate. Dye some white chocolate pink and yellow using oil-based food colouring, and colour in Hello Kitty’s bow and her nose. Place the mold in the freezer for about 10 minutes until the chocolate is set.
- Coat the insides of the mold with more melted white chocolate, to make the shell of the chocolates. Return this to the freezer to set, about 10-15 minutes. Fill the chocolates 70% of the way full with condensed milk, and return to the freezer until the condensed milk has hardened to touch.
- Pour more melted white chocolate on top to create the base of the chocolate, making sure to fully seal the chocolates closed. Return the chocolates to the freezer for a final time to set the chocolate base, about 5-10 minutes. Then unmold the chocolates and set them aside in the fridge. Don’t worry if the chocolates break when you are unmolding them. Just keep the pretty, intact chocolates for garnish, and use the broken chocolates in the next step.
- Allow the vanilla ice cream to soften enough to be mixed with a spatula. Add the strawberry jam and Hello Kitty chocolates (saving some for garnishing) and mix until incorporated. Mix roughly so that some of the chocolates break and the condensed milk gets ribboned throughout the ice cream.
- Transfer the ice cream to a Tupperware container and allow it to set, about 7 hours or up to overnight.
- To serve, scoop the ice cream into your desired bowls or ice cream cones, top with a Hello Kitty chocolate and enjoy!
Video
Notes
Want to see more video tutorials? Check out all of my recipes here!
http://www.youtube.com/pankobunny