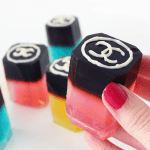
Chanel Nail Polish Gummies
Ingredients
Glass bottles:
- 4 cups of water
- 8 g powdered agar
- ½ cup sugar
Nail Polish cubes (per colour):
- 1 cup water
- ¼ cup sugar
- food colouring
- flavouring
- 3 tbsp gelatin
Bottle tops:
- 3 cups pure cherry juice or any juice that is a dark, almost black colour
- ¼ cup milk
- 3 tbsp sugar
- black food colouring
- 8 g powdered agar
- toothpicks
- melted white chocolate
Instructions
- First, make the nail polish cubes. Pour the water, sugar, food colouring and flavouring into a small pot and set to high heat. Bring the liquid to a boil, then gradually sprinkle in and dissolve the gelatin, whisking well after each addition. Doing so will prevent any lumps from forming.
- Then pour the liquid into a deep container. We will be slicing the gummies into 2cm (wide) x 3 cm (tall) rectangles, so any deep, rectangular container will do.
- Place the container into the fridge until it has completely set, about 1-3 hours. Repeat for as many colours as you like!
- Once they have fully set, slice the gummies into tall rectangles that are 2cm wide on all sides and 3cm tall. Then set these on a plate and place in the fridge.
- Now, make the mixture for the glass bottles. Pour the water and agar into a pot and whisk to combine. Set the pot to high heat and dissolve the agar as the water heats up. Add the sugar. Once the liquid comes to a boil, bring the heat down to low and simmer for 3-4 minutes. Pour the liquid into a 9”x5” glass loaf pan.
- Agar sets at room temperature, so keep the loaf pan on your counter and watch carefully until it begins to cool and set. You want the surface of the jelly to be just partially set, but the inside to be a thick jelly consistency. Working quickly before the agar fully sets, stick the nail polish cubes inside the clear jelly, spacing them about 2 cm apart. You should be able to fit about 6-8 cubes into the loaf pan. Make sure that the cubes are suspended in the jelly. They should be completely submerged, but not touching the bottom of the dish.
- Stick one toothpick vertically into each nail polish cube, to look like a brush. The residual heat of the clear jelly will soften the nail polish cubes, so immediately place the loaf pan in the fridge to completely set.
- Once the jelly has fully set, make the black lids. Pour the cherry juice, milk, sugar, agar and a few drops of black food colouring into a pot and bring to a boil. Whisk to fully dissolve the agar. Remove the pot from the heat and allow the liquid to cool until it is room temperature, but has not started to set yet (10-15 minutes). You should be able to stick your finger into the jelly and have it feel just barely warm. Doing this will prevent the other jellies from melting.
- Remove the loaf pan from the fridge, and with a sharp knife, make very shallow slices on the surface. This will allow the dark jelly to better adhere to the clear jelly. Then gently pour the dark jelly liquid on top. Place the loaf pan back into the fridge to completely set, about 1-2 hours.
- Once the jelly has completely set, carefully turn the jelly out onto a hard surface. The jelly should easily slide out of the loaf pan in one piece. Slice the jelly into cubes, leaving as much space between each nail polish cube as possible. You should be left with 6-8 large cubes with one nail polish cube in the center of each. Then trim each cube so that there is a few millimetres of clear jelly on each side of each nail polish cube. Trim the edges to soften the sharp edges of the cubes, to make them look like bottles.
- Using a toothpick and some melted white chocolate, draw the Chanel logo on the top of each bottle.
Video
Notes
Want to see more video tutorials? Check out all of my recipes here!
http://www.youtube.com/pankobunny