3D Chocolate Dolls
Ingredients
- white chocolate melted
- white chocolate chips
- Rilakkuma silicone chocolate mold or any silicone mold of your choice
For Decorating
- oil-based food colouring
- edible glitter or sprinkles
- toothpicks
- mini cupcake liners
Instructions
- Melt the chocolate in a bain marie: Fill a pot about an inch high with water and bring it to a boil. Reduce it to a simmer, then place a glass bowl over top, and add the chocolate. I use the microwave to melt chocolate a lot in my recipes, simply because it’s quicker, but this way treats the chocolate much more gently, and you don’t risk burning the chocolate.
- Fill the silicone mold melted white chocolate. Smooth out the surface with a knife, to create a flat surface, and place the chocolate in the freezer to fully set, for about 20 minutes.
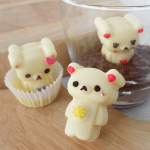
- Unmold the chocolates, and decorate half of chocolates with chocolate coloured with oil-based food colouring, as well as edible glitter or sprinkles. I added some eyelashes, blushing cheeks with some edible glitter hearts, as well as some lipstick! Return these to the freezer to set again.
- Then spread a thin layer of white chocolate on the flat side of 3 undecorated chocolates, and place the 3 decorated chocolates on top. Because these chocolates are cold from being in the freezer, the chocolate will set really quickly, so make sure to do them one at a time. Return these to the freezer to set again, around 10 minutes.
- If your chocolate shapes don’t have a flat base to them (like how my little bears have flat feet), you can make a little base for them so that they’ll stand upright! Instead of using regular chocolate (like from a chocolate bar), I’m using chocolate chips, because these set much quicker when melted rather than pure chocolate. Place some mini cupcake liners and in an empty egg carton. Melt the white chocolate chips, and place about ½ ~ 1 tsp into each cupcake liner. Place the chocolates on top in a standing position. Gently hold these in place until the chocolate can stand on its own, and then carefully transfer these to the freezer to set for a final time.
- To serve, you can either keep them in the cupcake liners as a really adorable gift, or you could add these to a dessert! I removed the cupcake liner and placed one in a glass and spooned some chocolate pudding around it to cover the base, and it looks like a little bear standing in pudding!
Video
Notes
Want to see more video tutorials? Check out all of my recipes here!
http://www.youtube.com/pankobunny