Jelly iPhone 6 Plus
Skip the line and get your iPhone early!
Servings: 1 phone
Ingredients
White Base of iPhone
- ½ cup water
- ½ cup milk
- 1 tbsp agar agar
Blue Screen
- 1 cup aloe juice or any lightly-colored juice
- blue food coloring
- 1 tbsp agar agar
Clear Coating of iPhone
- 2 cups water
- 2 tbsp sugar
- 2 tbsp agar agar
Apps and Phone Features
- ¼ mocha cookie dough recipe recipe here
- ½ lb icing sugar
- 1 large egg white
- 1/8 cup water
- food coloring
Instructions
- Make the white base by adding the water, milk and agar agar into a pan, and bringing it to a boil. Bring the heat back down to low, and simmer for 1-2 minutes. Allow this to slightly cool in the pan, and then pour it into a rectangular container. Place it in the fridge to set, about 5-10 minutes. Once it has fully set, gently remove it from the container and lay it on a sheet of plastic wrap.
- Then make the blue screen by adding the aloe juice, blue food colouring and agar agar into a pan, and bringing it to a boil. Bring the heat back down to low, and simmer it for 1-2 minutes as well. Allow this to slightly cool in the pan, and then pour it into the rectangular container. Place it in the fridge for 5-10 minutes to set. Once it has fully set, remove it from the container and place it on another sheet on plastic wrap.
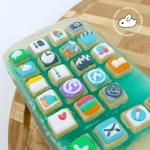
- Make the apps by rolling out the cookie dough until it is 2-3mm thick. Cut out 23 squares that are 1.5cm on all sides. I recommend cutting out some extra just in case some become misshapen when baking. Also cut out a circle for the home button (1.5 cm in diameter), and the receiver area (2 cm long). Transfer these onto a baking sheet lined with parchment paper, and bake at 350F for 5 minutes. The receiver area will brown quicker, but we’re going to cover that with white icing, so it doesn’t matter too much. Allow these cookies to fully cool.
- To make the icing, mix together the icing sugar and egg white in a bowl with a hand mixer. Add the water, and beat on high until the icing forms a ribbon when drizzled, and stays on the surface for 5 seconds. Then divide the icing into 9 bowls – 6 medium and 3 tiny. Dye the icing in the 3 tiny bowls yellow, grey and red. Dye the remaining bowls green, blue, orange, black, purple and white. We’ll be using white in many places, so divide the icing so that there is a bit more white than any other color.
- Divide the icing into piping bags fitted with a very small tip, and pipe the designs of the apps onto the squares. This can be fiddly, but just keep going! It looks so cute at the end. Then pipe a line of white icing onto the receiver area.
- Slice the white iPhone base into the general shape of the iPhone while it is resting on the plastic wrap. Then place the blue screen with the plastic wrap on top, and gently slice the screen into your desired length. Then separate these two layers and set them aside.
- Make the clear coating of the iPhone, by bringing the water, sugar and agar agar to a boil in a pan, and then reducing it to a simmer. Simmer for 1-2 minutes, and then let it slightly cool.
- To assemble the iPhone, spoon some of the clear coating into the bottom of the rectangular dish. Just spoon enough to cover the bottom of the dish. Then place the white iPhone base on top, and center it in the dish. Make very shallow slices in the top of the white base with a sharp knife. Then spoon a thin layer of clear coating on top. The shallow slices will allow the white base to better attach to the clear coating. Then place the blue screen on top. Place the home button and receiver area onto the white base of the iPhone. Being very gentle, spoon a very small amount of clear coating onto the blue screen, and place the app cookies on top. Make sure not the get the icing wet, as the color will run all over the jelly. Continue spooning very small amounts of the clear coating onto the blue screen to act like a glue when sticking the apps on top. Once all of the apps are in place, very carefully spoon the clear coating around the iPhone, so that the white base, home button and receiver area is completely submerged, and that the base of the app cookies are surrounded by jelly. You can place a few drops of the clear coating in between the app cookies, but be careful not to drip any onto the surface of the cookies.
- Place this back into the refrigerator until it is completely set. Then gently slide a knife around the edges, and slide it onto a sheet of plastic wrap. Then trim off the excess edges of the clear coating, and you’re done!
Video
Notes
The jelly that I used, agar agar, sets much more firmly than gelatin, so it’ll feel more crisp and refreshing. Because it is firmer, it’s also less flexible, so you need to be quite gentle when removing it from the mold. Don’t bend it too much, or it might crack.
Cracks can always be fixed by spooning some more of the liquid agar agar mixture on top, and then quickly placing it in the fridge.
The jelly sets at room temperature, which means that you won’t have to be sitting around for hours on end waiting for it to set. I do pop it in the fridge for setting, but that’s just because I’m impatient, and the coldness of the fridge speeds up the setting time so much.
I advise you to make sure that you don’t allow the clear jelly to touch the icing on the cookies, because it will dissolve and the jelly will take on the color of the icing.