Burberry Swiss Roll Cake
This cake is every bit as lovely as Burberry's classic trenches and check-patternedbags. It’s very light and fluffy, and the cream and banana filling pair perfectly with it!
Servings: 1 cake
Ingredients
Cake:
- 4 eggs
- 1/3 cup sugar
- ¼ cup water
- 8 tsp vegetable oil
- vanilla extract
- 2/3 cup + 3 1/2 tsp cake flour
- 1 tsp corn starch
- a pinch of cream of tartar
- black food coloring
- red food coloring
- brown food coloring
Syrup:
- 3 tsp sugar
- 4 tsp hot water
Filling:
- 2/3 cup whipping cream
- 4 tsp sugar
- vanilla extract
- 1 banana
Instructions
Prep
- Place a Burberry-patterned sheet in a 9×9 inch baking pan. Place a sheet of parchment paper on top, and make little slices in the corners so that it fits snugly into the pan. Then lightly grease the parchment paper with a paper towel dipped in vegetable oil.
- Divide the 4 eggs so that you have a bowl with 1 egg white, a bowl with 3 egg whites and a bowl with 3 egg yolks. You’re not going to need to remaining 1 egg yolk.
- Preheat the oven to 340F.
Directions
- Whisk together the 3 egg yolks in a bowl, and add half of the sugar. Beat with a hand mixer until it lightens in color. Add the water, vegetable oil and a few drops of vanilla extract, and mix together.
- Sift in 2/3 cup of cake flour, and mix until the batter thickens and is a ribbon-like consistency. This will be called the Egg Yolk Batter.
- Spoon 1 tablespoon, 1 teaspoon and another 1 tablespoon of the Egg Yolk Batter into 3 separate bowls. Add 1 ½ teaspoons of cake flour and some black food coloring into one of the bowls with 1 tablespoon of batter (Batter A), add 1 ½ teaspoons of cake flour and a pinch of cream of tartar into to the other bowl with 1 tablespoon of batter (Batter B), and add ½ teaspoon of cake flour and some red food coloring into the bowl with 1 teaspoon of batter (Batter C).
- Beat 1 egg white in a separate bowl with a hand mixer until it is glossy and reaches stiff peaks. Add a pinch of cornstarch, and whip it until it stiffens even more. This will be referred to as the Meringue.
- Add 1/3 of the meringue mixer to both Batter A and Batter B. Add 2 tablespoons of the remaining Meringue to Batter C, and mix well until the meringue is well combined into each bowl of batter. Pour each bowl of batter into a piping bag fitted with a small, round tip.
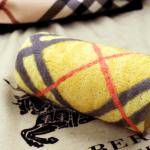
- Draw the red X of the Burberry design into the cake pan that you prepared earlier with Batter C. Place this in the oven as soon as you’re finished piping, and cook for 1 minute. Pipe the black check pattern directly on top with Batter A, and cook it in the oven for 1 minute 30 seconds. Lastly, fill the space between the black stripes with Batter B, and bake for 1 minute 30 seconds.
- In a separate bowl, beat the other 3 egg whites until they thicken and form a ribbon when the whisk is lifted. Add the remaining Meringue, and beat until stiff. Then add the remaining sugar, and when the mixture develops a shine to it, add the cornstarch and mix again.
- Mix in a tiny amount of brown food coloring to the Egg Yolk Batter to create a beige-colored batter. Add the mixture with the Meringue to the Egg Yolk Batter in 3 batches, and mix well until it is well combined and has a ribbon-like consistency.
- Then pour the batter into the cake pan. Smooth out the surface, and tap it on the countertop a few times to remove the air. Bake it in the oven at 340F for 14 minutes.
- Once it is finished baking, place a sheet of parchment paper on the surface of the cake, and flip it over onto a cooling rack.
- Immediately peel off the parchment paper from the side with the design, and place another sheet of parchment paper on top. Then allow the cake to fully cool (about 15 minutes).
- Make the cream filling: Place the cream and sugar in a bowl. Then place the bottom of the bowl in ice water, and whip until the cream stiffens. Add a few drops of vanilla extract.
- Make the syrup: Dissolve the sugar in the hot water.
- Once the cake has cooled, flip the cake over so that the patterned side is facing down. Then peel off the parchment paper from the non-patterned side. Slice of both ends of the cake diagonally so that it will fit together nicely.
- Using a knife, make shallow slices 2 cm apart on the surface of the cake. Brush on the syrup with a pastry brush.
- Spread the cream onto the cake, stopping about 3 cm from one end of the cake. Then place the banana on top.
- Lift up the side of the cake and the parchment paper closest to you, and roll the cake away from you in one motion. Then continue to tightly roll the cake up with a firm grip. If the cake doesn’t roll up very tightly, you can wrap the cake in plastic wrap to help. Twist the sides of the parchment paper closed like a candy wrapper, and place it in the fridge for 1 hour.
- After the cake has rested, slice the ends of the cake off with a warm knife. This allows you to cleanly slice through the cake and cream.
Video
Notes
And the template that I used to trace the Burberry pattern is posted below the recipe!